0DTE Flow
This is the live futures decision screen. Read it from top to bottom: permission first, invalidation second, target third, then route, drive, flip control, and wall deck.
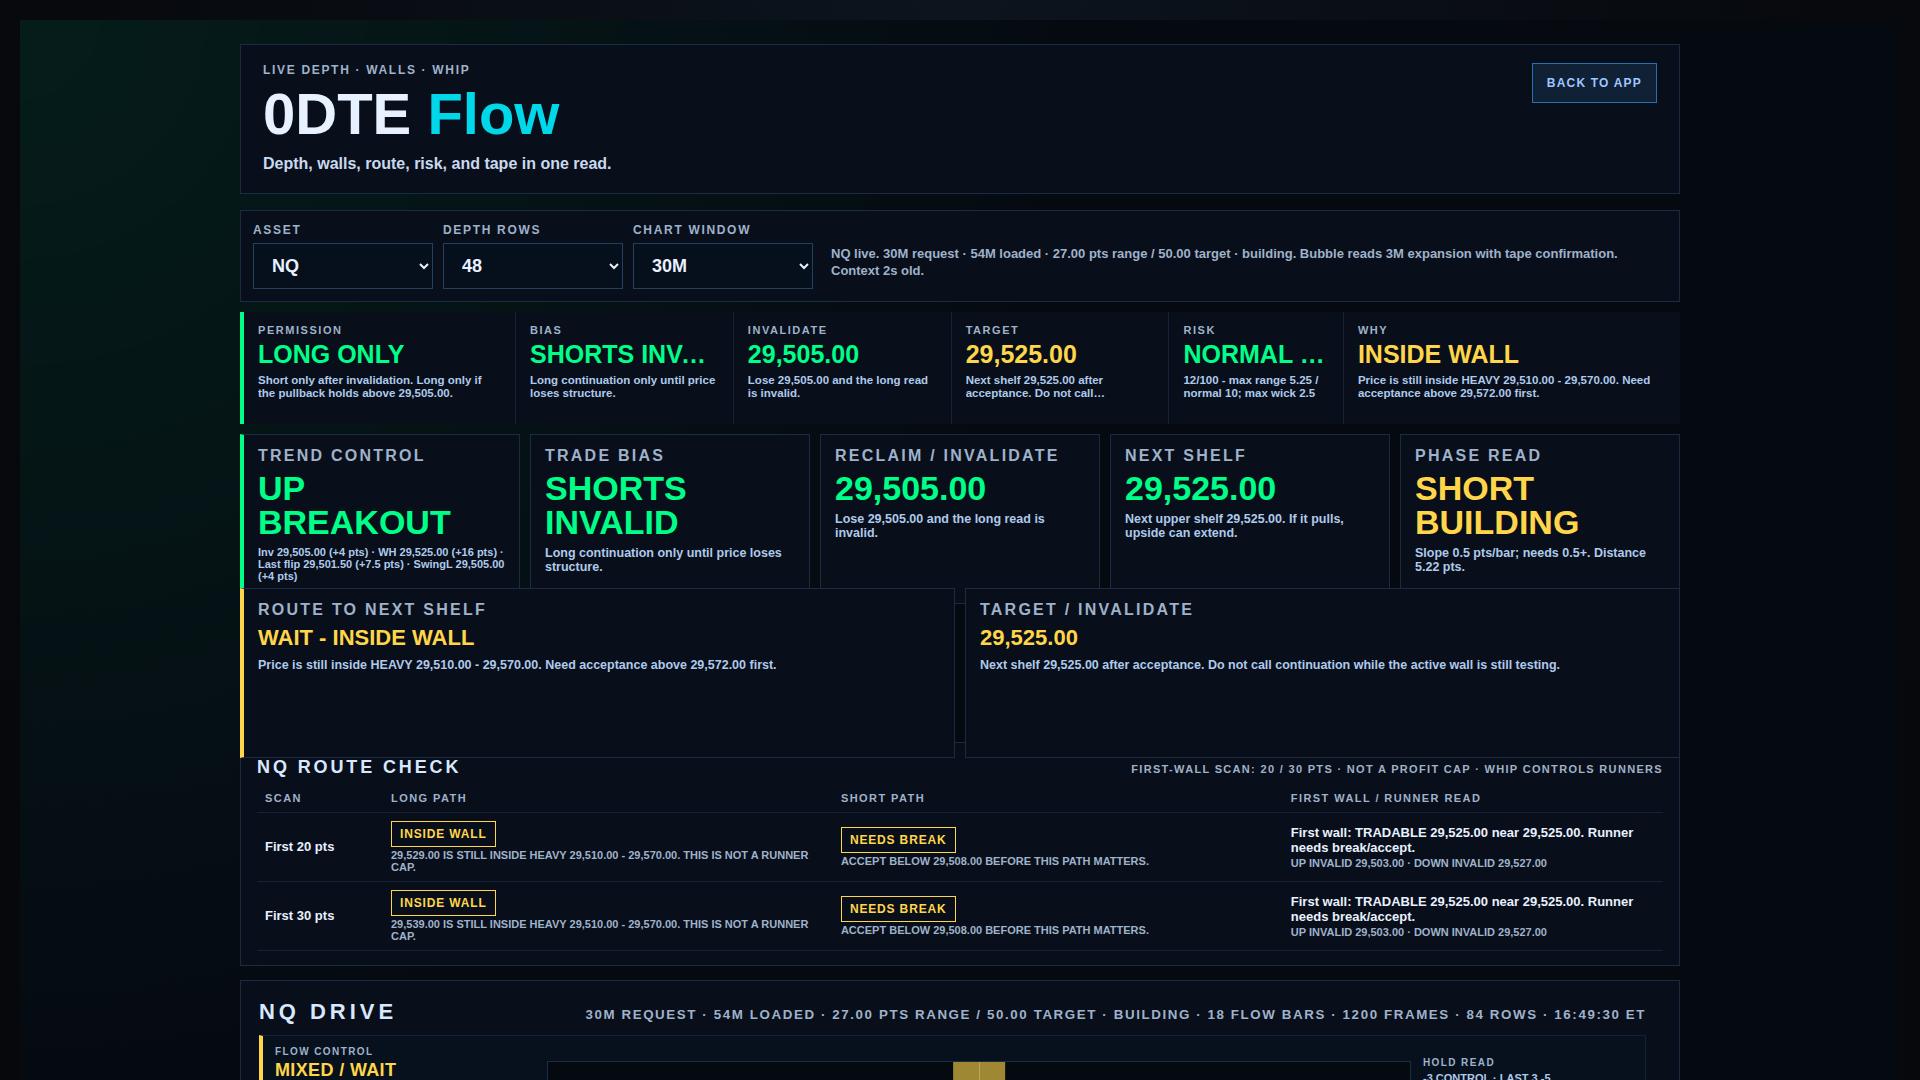
What 0DTE Flow is for
0DTE Flow is not a heatmap and not a standalone signal generator. It is a trade permission layer. It takes pressure, Wall Hunter levels, route room, stop risk, tape/flow behavior, and flip-line control, then turns them into a plain read.
The screen should answer four questions before you click: Am I allowed to trade? Which side? Where am I wrong? Where is the next target?
The thirty-second version
Only act in the printed direction and only while the invalidation line holds.
Something is incomplete: inside wall, route too short, pressure disagreement, or mixed flow.
Stop risk, broken route, or opposing pressure makes the click low quality.
The best read is not the prettiest chart. The best read is permission plus enough room to target plus a clean wrong line.
Permission comes first
The top strip is the command row. If it says WAIT, do not dig through the page trying to justify the trade. The page is telling you the current setup is not clean.
| Field | Meaning | How to use it |
|---|---|---|
| Permission | Trade allowed, long only, short only, wait, blocked, or inside wall. | This is the first gate. If blocked, skip the click. |
| Bias | The active directional read. | Do not fight it unless price invalidates it. |
| Invalidate | The line where the current read is wrong. | Use it as the trade's kill line, not as decoration. |
| Target | The next relevant WH shelf or route target. | Do not enter if the target is too close to justify the risk. |
| Risk | Stop-risk/wick-risk condition. | High risk means wait for cleaner structure or reduce aggression. |
| Why | The main reason permission is allowed or blocked. | This explains the current gate in plain language. |
Use the useful distances
The Trend Control card no longer uses a broad “up from recent low” trivia line. It now prints the distances that matter:
- Inv means invalidation. If this fails, the current read is wrong.
- WH means Wall Hunter. This is the next wall target or blocker.
- Last flip / Flip is the pressure flip shelf. Price above it favors long control; below it favors short control.
- SwingL / SwingH is the latest meaningful pullback low or swing high.
Route decides whether the trade has room
Route To Next Shelf checks whether the current side has enough space before the first major wall. A good idea can still be blocked if the next wall is too close.
Price is still inside an active wall. Need acceptance beyond the wall before continuation matters.
Price has room to the next shelf, pressure agrees, and invalidation is defined.
Drive checks whether the move has support
The Drive section blends local flow, pressure, wall corridor, lane behavior, and stop risk. It is the quality check under the permission row.
- Flow Control: buy/sell pressure from recent depth behavior.
- Major Wall Corridor: where price sits between major support and resistance.
- Local Lane: whether the last local bar is moving cleanly or stuck.
- Drive Edge: combined read. Treat weak or mixed drive as a reason to wait.
Flip control is the boundary read
The Whip chart has pressure, Omega, Whip, Wall Hunter levels, and flip shelves. The new Flip Control box focuses on one question: is the active flip line valid enough to trade above or below?
| Read | Meaning | Action |
|---|---|---|
| TAKE LONG | Price is above a confirmed flip shelf and at least two trend checks agree. | Long side is valid while the shelf/invalidation holds. |
| TAKE SHORT | Price is below a confirmed flip shelf and at least two trend checks agree. | Short side is valid while the shelf/invalidation holds. |
| WATCH | The flip is forming or dashed. | Do not treat it like a confirmed shelf yet. |
| WAIT | No active shelf, price is testing the shelf, or trend disagrees. | Wait for acceptance and agreement. |
Above a valid flip line with up-trend agreement is long control. Below a valid flip line with down-trend agreement is short control. Losing the line means that side lost control.
Tradable walls are targets and blockers
The Wall Deck shows the loaded WH levels. The material label is intentionally simple now: TRADABLE, HEAVY, WATCH, or CONTEXT.
- TRADABLE: strong enough to power routes and goals.
- HEAVY: important context, but not automatically a trade route.
- WATCH: visible but secondary.
- CONTEXT: option context only. It should not power goals by itself.
How to use it during the session
- Read Permission. If it says wait, respect it.
- Read Bias. Trade only that side unless structure flips.
- Read Invalidate. Know the line where the idea is wrong.
- Read Target. Make sure there is enough room to the next wall.
- Check Trend Control for invalidation cushion, WH distance, flip distance, and swing structure.
- Check Route. If inside wall or blocked, wait for acceptance.
- Check Whip / Flip Control. Use the flip shelf as the hold boundary.
- Check Wall Deck. Know the next support/resistance before the click.
What it does not promise
0DTE Flow is decision-support software. It does not guarantee a level will hold, does not know hidden orders, and does not replace execution discipline.
The screen can be right about direction and still block a trade because the entry is too close to a wall, inside a wall, or carrying poor stop risk. That is a feature, not a bug.