Before you chase the move, check the trend behind it.
A rally can look strong on a short chart and still be running into a larger downtrend. 01DTE follows the swing across five timeframes and puts executed buying and selling beside price.
$0 today. Then $149/month unless canceled before the 15-day trial ends.
ONE SWING · FIVE TIMEFRAMES4H → 3m
4 hours1 hour30 min15 min3 min
Illustration of the comparison. Not live data or a trade signal.
NQ / MNQ pressure4-hour to 3-minute trendsFutures options gammaSPX GEX
FROM THE PRODUCT
Watch what happens when price gets back to the level.
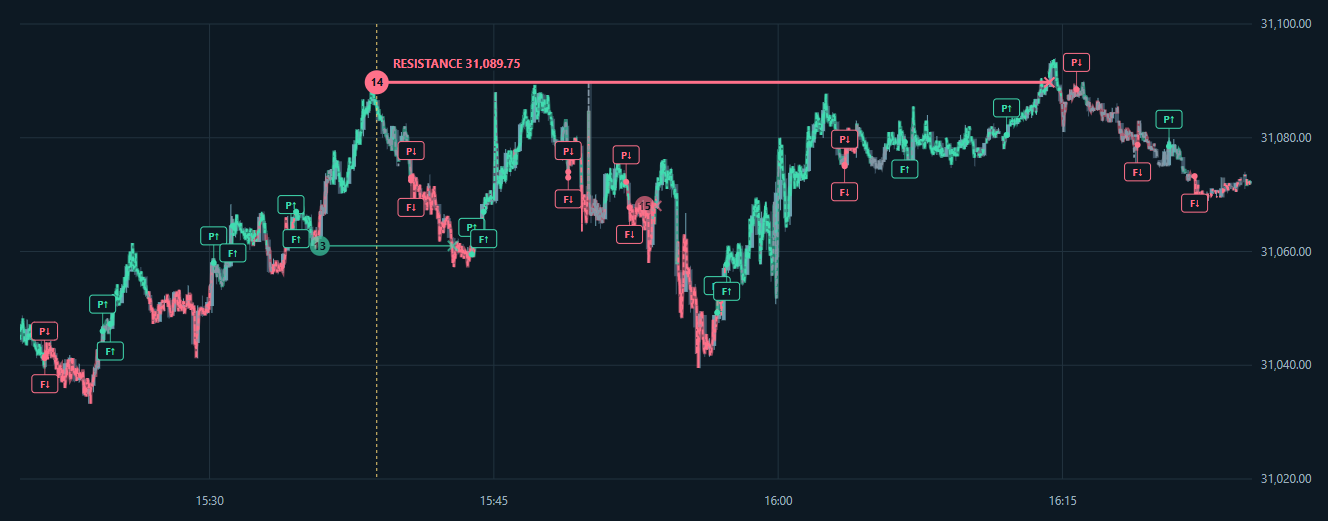
In this recorded NQ session, price returns to the marked resistance several times. Pressure and Flow direction markers let you compare the trades with each visit. You can inspect the sequence instead of relying on the color of the latest candle.
Actual recorded NQ session · October 2, 2026 · 15:20–16:25 ET. Historical readings, not live data or a performance result. Click to enlarge.
The horizontal line identifies the recorded resistance at 31,089.75.
P and F mark Pressure and Flow direction changes. They are readings, not trade fills.
WHAT YOUR MEMBERSHIP INCLUDES
Choose the question you need answered.
The tools share one membership. Start with the view that fits the way you trade.
01 / OPTIONS LEVELS
Gamma Force
Where are the options concentrations near price?
Gamma Force ranks options gamma concentrations and puts the levels on the price chart. Open the strike table when you want to inspect the call and put readings.
Market Auction follows your selected swings through five timeframes. Watch the structure update as fresh prices arrive and keep the selected range in view.
Keep the four-hour swing in view while you inspect the three-minute move.
Choose the swing high and low you want to follow. 01DTE traces that structure through the four-hour, one-hour, 30-minute, 15-minute and three-minute charts.
As fresh prices and candles arrive, you can see whether the next rally is approaching a descending ray or moving through it. Rising and falling structures can appear together.
Pressure Pulse then lets you count the executed buying and selling below a red ray or above a green ray. Compare that pressure with the price change since tracking began.
Futures order flow, trend analysis and options gamma answer different questions.
A green NQ candle tells you price finished higher over that interval. It leaves other questions open: where the move sits in the larger swing, how much buying traded, and which options levels are nearby. 01DTE gives you separate views of those observations.
For NQ and MNQ traders
Start with the NQ swing you want to follow. Market Auction carries your selected starting points through five chart timeframes, so a short rally can be compared with the larger trend.
Pressure Pulse shows executed buying and selling for the selected NQ or MNQ contract. Compare those totals with the price response. Net selling while price holds is a different observation from net selling while price continues lower.
Gamma Force locates options concentrations around price. That helps you choose which strikes to inspect before watching how the market responds nearby.
The dedicated SPX GEX view adds an estimated net gamma reading and modeled gamma flip for today’s SPXW expiration. Its price reference is the SPX cash index. NQ and MNQ pressure describe their own futures markets; those counts do not measure SPX options trades.
The public examples explain what you’ll see in the member workspace. Use the trial to compare the readings with your own charts and trading process. Each tool shows its market and data status so you can keep the comparison specific.
FROM THE PEOPLE BUILDING 01DTE
Why we would pay $149 a month for this workspace.
The full ladder, the larger swing, and the price where tracking began: the features we asked for during development explain what we believe is worth paying for.
Try the trend analysis during a developing move. Follow an NQ or MNQ pressure ladder, or compare SPX with the modeled gamma flip. You get 15 days to decide whether these readings earn a place beside your charts.
Gamma Force and the SPX GEX view
Pressure Pulse with NQ / MNQ executed volume
Market Auction and multi-timeframe trend analysis
Market coverage varies by tool. Manual order entry requires a separate NinjaTrader connection and approval.
Futures traders who want options levels and executed volume beside price, and SPX traders who want a dedicated gamma view. Pressure and Flow focus on NQ / MNQ; market coverage varies by tool.
Do I need NinjaTrader to use the website?
You can view the shared market readings in the browser. Placing manual orders from Pressure Pulse requires your own NinjaTrader connection, the member connector and execution approval. Live accounts require live approval. Review the setup requirements.
What will I see when data is delayed?
The tools show data ages and identify delayed readings. Some views retain the last valid snapshot with its timestamp. Live tracking may pause until fresh data returns.
What happens after the trial?
The 15-day trial is $0 today and continues at $149/month unless you cancel before it ends. Review the subscription terms at checkout. You can also compare the other access options.